Wednesday, May 18, 2011

Google REST Web Service Security C# URL Authentication

Google URL Signing
 
To access certain Google API web services a Client ID and a digital signature is required.  A Client ID and a cryptographic key (used to generate a unique digital signature) are provided by Google once consumers have created an account.  Before a REST web service request can be made, a digital signature must be generated and passed in as part of the URL, this process is known as URL signing.  The cryptographic key, sometimes called shared secret/signing key must be kept secret and is never passed in as part of a URL request.

The following are required before a digital signature can be generated:

  • A signing string (made up of the path and query of the request URL).
  • A signing key (cryptographic key provided by Google).
  • The correct encryption algorithm (Hash Message Access Control eg. HMAC SHA1, HMAC SHA2).

To generate a digital signature requires the following 3 steps.

1)  Construct request URL, the URL must be percent-encoded/URL encoded to ensure it is valid.

Constructing a valid URL

A URL is made up of reserved and unreserved characters.  Reserved characters in a URL have a specific purpose, for example a ‘/ ’ separates the different parts of a URL.  If a ‘/ ’ is required in a URL for any other purpose, then it must be percent-encoded to distinguish it from its reserved counterparts.  Percent-encoded reserved characters are always preceded by a ‘%’ to indicate percent-encoding.

The following are reserved characters:

!  * ' ( ) ; : @ & = + $ , / ? % # [ ]

To percent-encode a URL’s reserved characters, use the pair of hex digits which corresponds to each reserved character’s ASCII value, finish by preceding each hex digit pair with a ‘%’.  If any reserved character is non-ASCII then use the pair of hex digits which corresponds to its UTF-8 character instead.

For example, to percent-encode a '/ ':

a)  convert to or look up the ASCII value for a ‘/ ’, the ASCII value is 47

b)  next look up the pair of hex digits which correspond to this ASCII value, the hex digit pair is 2F

c)  next precede with a ‘%’, the result is %2F

URL encoding the following URL:

http://maps.googleapis.com/maps/api/geocode/json ?address=East 25th St & 3rd Ave&sensor=false&client=yourClientID

The address parameter contains spaces, spaces are not allowed in a URL, it also contains a '&'.  This URL must be encoded by replacing spaces with a '+', and replacing '&' with the two hex digits corresponding to its ASCII value.

Encoding would produce the following URL:

http://maps.googleapis.com/maps/api/geocode/json?address=East+25th+St+%26+3rd+Ave&sensor=false&client=yourClientID

For more information on ASCII characters and their corresponding pair of hex digits see the following link:


To see a list of reserved/unreserved characters and additional information on URL usage, go to the following link.


2)  Using the encoded URL

http://maps.googleapis.com/maps/api/geocode/json?address=East+25th+St+%26+3rd+Ave&sensor=false&client=yourClientID

Omit the protocol and host, leaving only the path and query, now you have the signing string.

/maps/api/geocode/json?address=East+25th+St+%26+3rd+Ave&sensor=false&client=yourClientID

3)  Generate signature using signing key, signing string and encryption algorithm.

Google provides a C# method for developers called ‘Sign’, this method accepts two string parameters and returns the signed URL request in full as a string.  When calling this method the full URL and the signing key are passed in as the two parameters of type string, see the method below.

Google’s C# 'Sign' method code snippet

public static string Sign(string url, string keyString)
{
      ASCIIEncoding encoding = new ASCIIEncoding();
      // converting key to bytes will throw an exception, need to
      // replace '-' and  '_' characters first.

      string usablePrivateKey = keyString.Replace("-", "+").Replace("_", "/");

      byte[] privateKeyBytes = Convert.FromBase64String(usablePrivateKey);

      Uri uri = new Uri(url);

      byte[] encodedPathAndQueryBytes = encoding.GetBytes(uri.LocalPath + uri.Query);

      // compute the hash

      HMACSHA1 algorithm = new HMACSHA1(privateKeyBytes);

      byte[] hash = algorithm.ComputeHash(encodedPathAndQueryBytes);

      // convert the bytes to string and make url-safe by replacing '+' and '/' characters

      string signature = Convert.ToBase64String(hash).Replace("+", "-").Replace("/", "_");

      // Add the signature to the existing URI.

      return uri.Scheme+"://"+uri.Host+uri.LocalPath + uri.Query +"&signature=" + signature;
}

A signature parameter is attached to the end of the URL, and the fully signed request URL is returned as a string.

http://maps.googleapis.com/maps/api/geocode/json?address=East+25th+St+%26+3rd+Ave&sensor=false&client=yourClientID&signature=HMACgeneratedSignature

Using this process a request can be made to any Google web service which requires a digital signature.

To download Google's C# console application for URL signing, which includes the 'Sign' method shown above, see the following link:


In some cases SSL (Secure Socket Layer) is used to provide transport level security when making requests. In these situations change the protocol from ‘http’ to ‘https’, before making the request.

Google Maps API Web Services require URL Authentication, documentation is provided on the URL signing process, how to produce valid URL's, SSL Access and processing XML results.  See the following link for more information:

Yahoo REST Web Service Security

Yahoo REST Web Service Authentication

All Yahoo API web services are free to consume at present.  Once service consumers have signed up for an account with Yahoo, they are assigned an API Key/Application ID.  When making a REST web service call the API Key must be included in the URL request.

Some Yahoo API web services use basic http authentication if a username and password is required, the Delicious API from Yahoo is an example.  The http Authorization header is assigned the value of the base64 encoded username and password.  A client with the following credentials:

username = MyUserName
password = MyPsswd

Places the username and password together to create the following string, which is then encoded using base64.

MyUserName:MyPsswd

The resulting base64 encoded string is passed as a http header during the request, for example:

Authorization: Basic TXlVc2VyTmFtZTpNeVBzc3dk

The Delicious API also uses Secure Socket Layer (SSL) for transport level security, the https protocol is used instead of http when making a request.  Some service providers use HTTP-Auth and SSL in combination.

Amazon Web Services (AWS) URL Authentication

There are two types of web service requests that can be made to Amazon Web Services (AWS).

  • Anonymous requests are made to freely available services using an Access Key ID which is issued when consumers sign up for an account.  This key is included as a request parameter in all requests made to AWS.
  • Authenticated requests must contain a request signature, in other words the URL must be signed using a generated digital signature.

    AWS Access Identifiers are an Access Key ID which is your identity/username and a Secret Access Key which is your password.  The Secret Access Key must be kept secret and is never used in requests, it is instead used together with an encryption algorithm during the signing process.  The Secret Access Key is a 40 character alphanumeric sequence issued to consumers by AWS.


    A Recipe for Signing URL Request’s to AWS

    1)  Construct your request URL.


    The following is a dummy URL

    http://aws.amazon.com/onca/xml?Service=AWSDummyService&AWSAccessKeyId=00000000&Operation=DummySearch&ResponseGroup=DummyInfo,TopSellers,NewReleases&Version=2011-05-05

    2)  TimeStamp your URL.

    Attach a time stamp to the end of your URL.

    http://aws.amazon.com/onca/xml?Service=AWSDummyService&AWSAccessKeyId=00000000&Operation=DummySearch&ResponseGroup=DummyInfo,TopSellers,NewReleases&Version=2011-05-05&TimeStamp=2011-5-03T14:22:58Z

    For more info on UTC format TimeStamp, see the link below.

    http://en.wikipedia.org/wiki/Unix_time

    3)  URL encode any reserved characters used by query parameters.

    The ResponseGroup parameter contains comma’s and the TimeStamp parameter contains colons, comma’s and colons are reserved characters. To URL encode a reserved character, use the hex digit pair corresponding to the reserved character’s ASCII value, then precede the hex digit pair with a ‘%’.

    Reserved Character              Hex Digit Pair
              ,                                        %2C
              :                                        %3A

    The URL encoded dummy URL:

    http://aws.amazon.com/onca/xml?Service=AWSDummyService&AWSAccessKeyId=00000000&Operation=DummySearch&ResponseGroup=DummyInfo%2CTopSellers%2CNewReleases&Version=2011-05-05&TimeStamp=2011-5-03T14%3A22%3A58Z

    4)  Re-arrange URL query parameters in byte order to produce the canonical string.


    Capital letters come before lower case letters. A parameter name beginning with the capital letter 'D' precedes a parameter name beginnig with 'a', the names are NOT in alphabetical order.

    Dummy URL query parameters in byte order:

    AWSAccessKeyId=00000000&Operation=DummySearch&ResponseGroup=DummyInfo%2CTopSellers%2CnewReleases&Service=AWSDummyService&TimeStamp=2011-5-03T14%3A22%3A58Z&Version=2011-05-05

    The above is the canonicalized query string used to generate a signature.

    5)  Prepend Verb, Host and Path lines (preceding canonicalized query string) with a line break.

    HTTP Verb – GET, PUT, POST, DELETE or other
    Host - aws.amazon.com
    Path - /onca/xml (if the path is empty, use a / in its place)

    Each of the verb, host and path values must be on separate lines, and they must precede the canonicalized query string.

    6)  The signing string in full.

    PUT
    aws.amazon.com
    /onca/xml
    AWSAccessKeyId=00000000&Operation=DummySearch&ResponseGroup=DummyInfo%2CTopSellers%2CnewReleases&Service=AWSDummyService&TimeStamp=2011-5-03T14%3A22%3A58Z&Version=2011-05-05

    7)  Compute digital signature using signing string, Secret Access/Signing Key and a hash algorithm.

    The encryption algorithm can be HMAC SHA1 or SHA256. Amazon provides code samples in a variety of languages available to download for their Flexible Payment Service, the samples include code for generating digital signatures, see the following link.

    http://docs.amazonwebservices.com/AmazonFPS/2008-09-17/FPSBasicGuide/index.html?APPNDX_CodeSamples.html

    For more information on the Secure Hash Algorithm (SHA) see the following link.

    http://en.wikipedia.org/wiki/SHA_hash_functions

    8)  URL encode reserved characters in the signature.

    + and = characters in the signature must be replaced by hex digit pairs.

    9)  Create a signed request by attaching the signature to the end of the request URL.


    http://aws.amazon.com/onca/xml? AWSAccessKeyId=00000000&Operation=DummySearch&ResponseGroup=DummyInfo%2CTopSellers%2CnewReleases&Service=AWSDummyService&TimeStamp=2011-5-03T14%3A22%3A58Z&Version=2011-05-05&Signature=URLencodedSignature

    The above recipe can be used for Amazon's Product Advertising API and Amazon's Flexible Payment Service. For more information on the product advertising API see this link.

    http://docs.amazonwebservices.com/AWSECommerceService/latest/DG/index.html?CHAP_Intro_AAWS.html

    Sending a signature as a URL query parameter is not the only way to sign requests, a signature can be sent instead by using the Authorization header.  See below for an explanation on how this is achieved using Amazon's S3 storage service.


    Sending signed requests to Amazon S3 storage service

    If the signature is sent as a header, it must be set out as follows:

    Authorization: AWS AWSAccesskeyId : generatedSignature

    When using an Authorization header for authentication, the format of the signing string should be as follows:

    VERB + \n

    + CONTENT-MD5 header value + \n

    + CONTENT-TYPE header value + \n

    + DATE header value + \n

    + AmzHeaders names and values in lower case and in alphabetical order + \n

    + Resource

    The format of a signing string when using query string authentication instead of an Authorization header involves a minimal change, replace the DATE header value with an Expires parameter value.  The Expires parameter value indicates when you want the signature to expire.

    The Amzheaders are any headers that start with x-amz-.

    The string to sign must be URL encoded (UTF-8 encoded).

    The content-type and content-md5 values are optional, if their values are not included in the string, newlines (\n) must still be included where the values would have been placed.

    The resource value is the bucket and key values separated by a '/ '.

    For more information on S3 signed requests see the following link:

    http://s3.amazonaws.com/doc/s3-developer-guide/RESTAuthentication.html

    Monday, February 21, 2011

    Working with XML in C# .NET 3.5 Using XElement, xmlTrees and LINQ to XML

    XElement
    The XElement class represents an XML element. All elements in XML have names, they may or may not have attributes or content.

    The namespace System.Xml.Linq is required when working with XElement.

    The following link provides information on the different types of content an XElement can contain.

    http://msdn.microsoft.com/en-us/library/bb943882(v=VS.90).aspx

    For more information on the XElement class from the Microsoft site see the following link.

    http://msdn.microsoft.com/en-us/library/system.xml.linq.xelement(v=VS.90).aspx

    The following link provides details on members the XElement type exposes.

    http://msdn.microsoft.com/en-us/library/system.xml.linq.xelement_members(v=VS.90).aspx

    To create a single XML element with no content:

    XElement objXElement = new XElement("Element1");

    objXElement now contains the following XML:

    <Element1 />


    To add content to the element:

    XElement obXjElement = new XElement("Element1", "ABCD");

    objXElement now contains the following XML:

    <Element1>ABCD</Element1>


    To create a parent element with a descendant, add a new XElement object as the content argument:

    XElement objXElement = new XElement("Parent", new XElement( "ChildElement1","ABCD");

    objXElement now contains the following XML:

    <Parent> 
    
         <ChildElement1>ABCD</ChildElement1> 
    
    </Parent>


    The XML produced matches the standard XML format.

    As more XElements objects are added as content arguments an xmlTree can be created.

    In addition to the XElement class, there is also a XDocument class which can be used to create XML documents. The following link provides information on this class from the Microsoft site.

    http://msdn.microsoft.com/en-us/library/system.xml.linq.xdocument(v=VS.90).aspx

    Working with XElement is far simpler than working with XDocument objects.
     
    xmlTree
     
    The following code snippet creates an xmlTree.


    XElement xmlTreeExample =

       new XElement(“Parents”,

               new XElement("Parent",

                       new XElement( "ChildElement1","ABCD"),

                       new XElement(“ChildElement2”,

                               new XElement(“GrandChildElement1”, “1234”)

                        )
                 )
        );

    xmlTreeExample now contains the following XML:

    <Parents>
    
        <Parent>
    
            <ChildElement1>ABCD</ChildElement1>
    
            <ChildElement2>
    
                <GrandChildElement1>1234</GrandChildElement1>
    
            </ChildElement2>
    
        </Parent>
    
    </Parents>


    Creating an xmlTree using XElement.Parse

    The above example is not the only way to create an xmlTree, XElement’s Parse method can be used to create an xmlTree from a string containing XML.

    XElement xmlTreeExample2 =

       new XElement.Parse(xmlString, LoadOptions.None);

    LoadOptions set to None will not preserve white spaces or retain line information. If this is required then set LoadOptions to LoadOptions.PreserveWhitespace or LoadOptions.SetLineInfo. Please note, using LoadOptions.SetLineInfo will mean taking a performance hit.

    Creating an xmlTree using XElement.Load

    Using the code snippet above, the XElement object ‘xmlTreeExample2’ can be saved in an XML file.

    xmlTreeExample2.Save(“TestTree.xml”);

    The Load method allows an XElement to be loaded from an XML file.

    XElement xmlTreeExample3 = XElement.Load(“TestTree.xml”);

    The Load method can also be used to load an XElement from a TextReader, xmlReader and using a stream an XElement instance can be created. See the following link for more information on these alternative methods.

    http://msdn.microsoft.com/en-us/library/bb350413.aspx

    The following link provides more information on creating xmlTrees

    http://msdn.microsoft.com/en-us/library/bb387068(v=VS.90).aspx
     
    LINQ to XML
     
    LINQ to XML is an approach to programming XML in .NET using LINQ query expressions. Query results can be used as parameters in XElement and XAttribute objects when creating xmlTrees. This functionality(known as functional construction) allows xmlTrees to be transformed from one shape to another.
     
    Simple LINQ to XML queries
     
    XElement xmlTreeExample4 contains the following XML:

    <Parents>

         <Parent>

            <ChildElement1>ABCD</ChildElement1>

            <ChildElement2>

                <GrandChildElement1>1234</GrandChildElement1>

            </ChildElement2>

        </Parent>

        <Parent>

             <ChildElement1>EFGH</ChildElement1>

             <ChildElement2>

                 <GrandChildElement1>5678</GrandChildElement1>

             </ChildElement2>

        </ Parent>

    </Parents>


    The following code snippet shows how to retrieve the value of the element ChildElement1 from each parent element in xmlTreeExample4.

    IEnumerable elementValue =

                 from parent in xmlTreeExample4.Descendants(“Parent”)

                 select (string) parent.Element(“ChildElement1”);
     
    The following code snippet shows how to retrieve the value of the element GrandChildElement1 from each parent element in the xmlTreeExample4.

    IEnumerable elementValue =

                 from parent in xmlTreeExample4.Descendants(“Parent”)

                 select (int) parent.Element(“ChildElement2”).Element(“GrandChildElement1”);
     
    To retrieve the values of all descendants of each Parent element the following code shows how this can be achieved.

    var parentData = from parent in xmlTreeExample4.Descendants(“Parent”)

    select new

    {

                child = parent.Element(“ChildElement1”).Value,

                grandchild = parent.Element(“ChildElement2”).Element(“GrandChildElement1”).Value

    };

    A for each loop can be used to loop through each object in parentData, like so

    foreach (var parent in parentData)

    {
                 //do some processing here
    }

    If each parent element in xmlTreeExample4 contained an attribute called ‘ParentName’, for example


    <Parent ParentName=”FirstParent”>


    To retrieve this ‘ParentName’ attribute value, the following can be done

    IEnumerable attributeValue =

                from parent in xmlTreeExample4.Descendants(“Parent”)

                select (string) parent.Attribute("ParentName");
     
    See the Microsoft site for more information on LINQ to XML

    http://msdn.microsoft.com/en-us/library/bb387098(v=VS.90).aspx

    For more information on Programming C# LINQ Query Expressions see this link

    http://msdn.microsoft.com/en-us/library/bb397676(v=VS.90).aspx

    Thursday, February 3, 2011

    Developing Rest Web Services using .NET WCF

    There are a number of ways to create a rest web service in visual studio.

    1)Convert an existing WCF soap web service into a WCF rest web service.

    The following 15 minute video shows how easy it is to accomplish this.
    http://channel9.msdn.com/shows/Endpoint/endpointtv-Screencast-Building-RESTful-Services-with-WCF/

    2)Download Microsoft's WCF Rest Starter Kit from the following codeplex site:

    http://aspnet.codeplex.com/releases/view/24644

    A white paper on developing rest in WCF using the rest starter kit can be found here:

    http://msdn.microsoft.com/en-us/library/ee391967.aspx

    The starter kit contains various templates to speed up the process of creating services. The templates include an Atom Feed WCF Service, AtomPub WCF Service, HTTP Plain XML WCF Service, REST Collection WCF Service and a REST Singleton WCF Service.

    3)Create a WCF Rest web service from scratch using a visual studio solution containing for example the following projects:-

    ASP.NET Web Application project template - this project is used to create a rest service. It contains a service contract class with operation contracts and data contracts.

    A Web Service template is also added to this project, this template is a visually designed class for creating a web service. This is where the implementation code for the operation contracts of the web service will be placed.

    Windows Forms Application project template - used to host the rest web service. This project contains an app.config file and a code file with service host code.

    Saturday, January 22, 2011

    Combining Cloud Computing, SOA and Web 2.0

    Service Orientated Architecture (SOA) and Web 2.0 technologies can help organizations  implement Cloud services in their IT environment.

    The following diagram shows the layers of an emerging Enterprise Computing Stack.

    Web 2.0 allows for building user interfaces and collaboration.  Within an organisation this technology is referred to as Enterprise Web 2.0, it can be delivered using enterprise portals such as Microsoft SharePoint, Oracle WebCenter Suite and IBM Websphere Portal.

    SOA enables the building and integrating of applications improving business agility.    SOA can be used to take advantage of Cloud services and present these resources to the users via Web 2.0 technologies such as AJAX, Mashups, RSS and enterprise social computing.  SOA greatly reduces the risks when building Hybrid cloud environments by providing a more integrated on-premise and public cloud solution.  SOA also makes it easier to move services between Cloud environments.  If an organization doesn’t have an on-premise cloud, having an SOA environment helps to identify and integrate public cloud services into the existing environment.

    The three Cloud computing layers shown in the diagram are:
    Infrastructure as a Service (IaaS) provides hardware and system software as a service including Storage, Compute and Networking.  These services provide access to IT infrastructure components.
    Platform as a Service (PaaS) provides services for creating, deploying and managing applications
    Software as a Service (SaaS) is application software delivered as a service.

    These Cloud layers can be implemented individually, they do not depend on one another.  SOA principles can be applied when building the Cloud layers.  SOA architectural principles for example can be used to build a service-oriented Infrastructure as a Service (IaaS) layer.

    Thursday, October 21, 2010

    Introduction to Microsoft Windows Azure Platform

     A good introduction to Windows Azure can be found at the following link

     http://msdn.microsoft.com/en-us/library/ff803364.aspx

    The Windows Azure SDK download (Sept 2010 UPDATE) is available here

    http://www.microsoft.com/downloads/en/details.aspx?FamilyID=21910585-8693-4185-826E-E658535940AA

    The SDK includes an off-line test environment called 'Developer Fabric', it is a simulation of Azure(Cloud Fabric), the subscription based production environment running in Microsoft's data centers. The SDK provides dev's with APIs, tools, docs and code samples to help develop app's on Win Azure.

    Also available to download is Win Azure Tools for MS Visual Studio(ver.1.2 June 2010)

    http://www.blogger.com/%20http://www.microsoft.com/downloads/en/details.aspx?FamilyID=2274a0a8-5d37-4eac-b50a-e197dc340f6f&displaylang=en#SystemRequirements

    This download includes Windows Azure SDK and can be used with VS2008 & VS2010. Dev's can create, configure, build, debug, run, package and deploy scalable web app's and services.

    There are some known issues/bugs in this SDK, some fixes can be found at

    http://code.msdn.microsoft.com/wcfazure/Wiki/View.aspx?title=KnownIssues

    A Windows Azure training kit is available to download, it comes with hands-on labs, presentations and demos designed to help you learn how to use Win Azure, SQL Azure and AppFabric. The June 2010 release includes new and updated labs for VS2010.

    http://www.microsoft.com/downloads/en/details.aspx?FamilyID=413E88F8-5966-4A83-B309-53B7B77EDF78&displayLang=en

    Web Developer Portals

    There are 4 portals associated with Windows Azure platform, 3 are subscription based the other is free to use. A windows Live ID is required to sign-in to these portals, you can sign-up for a Live ID on any one of the portal sign-in pages.

    1)Windows Azure Web Dev Portal - Subscription required, app's and services are uploaded to the cloud and are accessable as hosted services. Can be found at http://windows.azure.com/

    2)SQL Azure Web Portal - Subscription required, data stored in the cloud. Can be found at http://sql.azure.com/

    3)Windows Azure AppFabric Web Dev Portal - Subscription required, use Service Bus and Access Control. Found at http://appfabric.azure.com/

    4)Windows Azure AppFabric LABS Web Portal - FREE, test environment for developing against the AppFabric Service Bus. Found at https://portal.appfabriclabs.com/

    "How Do I?" Video Series for Windows Azure Platform

    A series of short videos covering Windows Azure, Azure Service Bus and SQL Azure can be found at:

    http://msdn.microsoft.com/en-gb/windowsazure/ff798080.aspx

    The videos duration ranges from 6 minutes to 75 minutes in length.

    For videos in this series covering Azure AppFabric -

    Get started with Azure Service Bus (24 minutes in length) covers signing up, creating projects, namespaces and service remoting via the service bus environment.
    http://msdn.microsoft.com/en-gb/windowsazure/ff181517.aspx


    Get started with Access Control Services (26 mins) covers authentication and authorization of WCF web services in the cloud.
    http://msdn.microsoft.com/en-gb/windowsazure/ee943797.aspx

    Create and use a service bus message buffer (22 mins) covers sending and receiving (simple text based and complex custom types) messages using a cloud message queuing system.
    http://msdn.microsoft.com/en-gb/windowsazure/ee943810.aspx

    Windows Azure Platform On Demand Webcasts

    For a list of recent webcasts covering Windows Azure Platform see the following link:

    http://www.microsoft.com/events/series/azure.aspx?tab=webcasts&id=odall

    No signing in is required to watch these webcasts.

    Some Windows Azure AppFabric webcasts from the link above -


    Introduction to Windows Azure AppFabric (Level 200) 61 minutes, Aug 2010


    Developing for Windows Azure AppFabric Service Bus (Level 300) 53 minutes, Sept 2010


    Securing Web Resources Using Windows Azure AppFabric Access Control (Level 300) 55 minutes, Aug 2010


    Communication Patterns Supported by Windows Azure Platform AppFabric (Level 200) 60 minutes, Oct 2009

    Microsoft TechEd North America June 2010 Videos

    Sharepoint and Azure (60 minutes)
    http://www.msteched.com/2010/NorthAmerica/OSP213

    Real World Patterns for Cloud Computing (68 minutes)- covers examples of cloud architectures
    http://www.msteched.com/2010/NorthAmerica/ARC304

    Securing the Cloud - Expert Panel (72 minutes)
    http://www.msteched.com/2010/NorthAmerica/SIA332

    Lap Around the Windows Azure Platform (75 minutes)
    http://www.msteched.com/2010/NorthAmerica/COS303

    The Economics of Cloud Computing (67 minutes)- covers pricing model and SLA's
    http://www.msteched.com/2010/NorthAmerica/COS306

    Getting Started with a Windows Azure AppFabric Labs Account using the Echo code sample

    In the following we will be using Echo Azure AppFabric SDK C# code sample, as our example application.

    The Echo code sample can be found in the AppFabricSamples\ServiceBus\Getting Started folder of the WinAzureAppFabricSDKSamplesV1C# download.

    Since these samples are intended to work using Windows Azure AppFabric Portal (subscription account) some configuration work is necessary in your environment and in the 'Access Control Service' section of your FREE Windows Azure AppFabric Labs Portal Account.

    Assuming you have signed up for a FREE Windows Azure AppFabric LABS Portal Account, you have created a project and a service namespace (see the How to create a Windows Azure Labs portal account blog entry on how to accomplish this).


    1) Windows Azure AppFabric SDK page, download SDK-x64 for 64bit OS or x86 for 32bit OS, SDK code samples and appfabric docs.

    http://www.microsoft.com/downloads/en/details.aspx?FamilyID=39856a03-1490-4283-908f-c8bf0bfad8a5&displaylang=en

    Install appropriate SDK.

    2) Windows Azure AppFabric LABS SDK Aug 2010 download page which can be found here

    http://www.microsoft.com/downloads/en/details.aspx?FamilyID=D89640FC-C552-446E-AEAD-B1E0D940F31B

    There is no SDK to download here since you already have the Windows Azure AppFabric SDK downloaded and installed. Download Release Notes and ServiceBus.config.txt files.

    RENAME ServiceBus.config.txt to ServiceBus.config

    Paste ServiceBus.config in the following dir (if you have 64bit)

    C:\Windows\Microsoft.Net\Framework64\v2.0.50727\CONFIG

    If you're using 32bit then replace Framework64 with your 32bit folder.

    3) Load the Echo code sample into VisualStudio. There are 2 projects in the solution both console app's, a WCF Service and a Client. Before you can run the app you need to create Issuer Credentials ie. an Issuer Name and Issuer Key(Issuer Secret). Later when you do run the app, run the service first, once its running start an instance of the Client, in the Client console you will be asked to enter some text to echo, the text you enter will then be echoed back by the Service.
      
    The Service takes your Issuer credentials passes them directly to AppFabric's ACS, then an endpoint is opened on the Service Bus in the Cloud. In order for the Client to access this Service Bus endpoint, it must have permission to communicate with it. The Client also takes your Issuer credentials, authenticates with AppFabric ACS Service in the Cloud, and aquires an access token that proves to the service bus infrastructure that the Client is authorized to access this endpoint. Once the client is connected you can type messages into Client console window and you will see messages echoed back by the running Service.

    4) Next create an Issuer Name and Issuer Secret (key). Sign in to your LABS Portal Account, select the project you created, then decide which Service Namespace you wish to use with this app. Click on the SERVICE BUS link of the service namespace you've chosen. The screen below is where you should be now, click orange Manage button to go to ACS Management Portal where you will create your new Issuer Credentials.


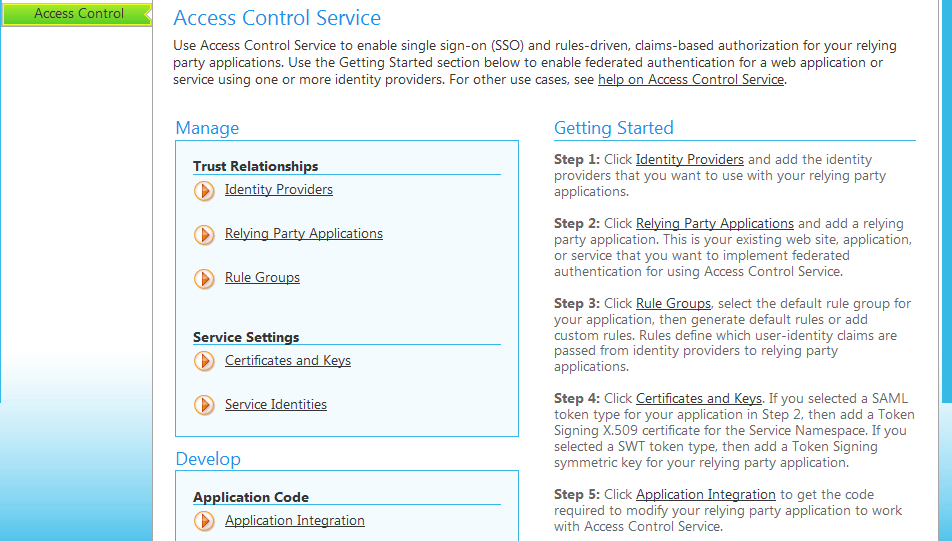
    Access Control Service is the next screen you will see, select Identity Providers (Step 1), the Echo app uses a very simple straight forward approach for dealing with authorization and authentication.  


    On the Identity Providers page select Service Identities


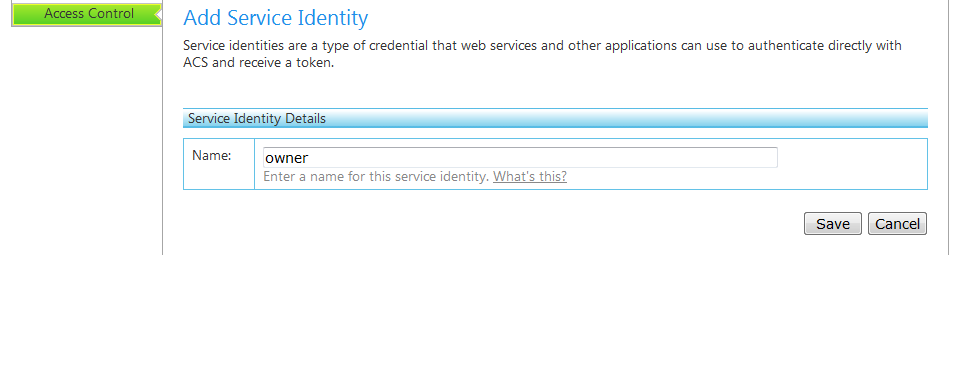
    On the Service Identities page, we will create an Issuer Name and Key. Select Add Service Identity.


    Enter owner as the Name, its the default name used by Microsoft, then press Save.

    Next click Add Credential.


    On the Add Credential page enter owner as display name, for Type select Symmetric Key (this is your Issuer key/Issuer Secret). Press the Generate button to create key, then press Save button.


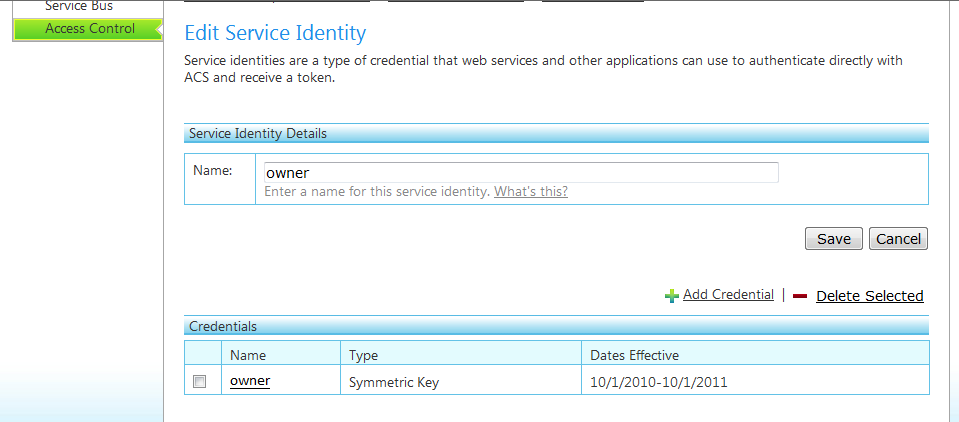
    You now have a new Issuer Name(owner) and Key. Under Credentials hover over your new Issuer(owner), the line will turn a blue colour, click on to blue line to see your full Issuer details, this takes you to the Edit Credential page.


    The Edit Credential page looks the same as the Add Credential page (see second image above). Click on the Service Identities link, it is just above the Edit Credential title near the top of this page. This will take you to the main Service Identities page which list all the Identities created including your new Issuer(owner) credential.

    This completes step 4. Next we go back to Visual Studio and the Echo app example.


    5) In Visual Studio expand Client project, open Program.cs. Comment out the following code lines as shown below.

      /*   Console.Write("Your Service Namespace: ");
                string serviceNamespace = Console.ReadLine();
                Console.Write("Your Issuer Name: ");
                string issuerName = Console.ReadLine();
                Console.Write("Your Issuer Secret: ");
                string issuerSecret = Console.ReadLine(); */


    Directly underneath add the following 3 lines of code. Enter your own service namespace (the one you created your Issuer Credentials under) and then enter your Issuer Key ( issuerSecret), this was generated for you.

    string serviceNamespace = "   "; //add your service namespace here

    string issuerName = "owner";

    string issuerSecret = "  ";   //add your generated key here

    Make the above code changes in the Service project of your solution as well. Save changes and Build Solution.

    Press F5 to start, the Service Command Window will open, it may seem to be slow, but give the Service time to establish a connection to the Service Bus, things will run faster after initial connection is made. Once you see your service bus URL on the first line and press enter to exit appear on the second line, the Service is up and running.

    While the Echo service is running you can see it publicly listed from your LABS Portal Account. Go to the Service Bus section of your service namespace, under the Service Bus title click Registry URL (see first image under Step 4)). In the image below you can see an Echo Service listed, once you stop your Service running it will no longer appear there.

    Run an instance of your Client, right click Client project name, select debug then select start new instance. Another command window will open, you will be asked to enter some text, when you do it will be echoed in the Service command window.
     
    The Echo code sample is a simple introduction to service remoting. A Client and a Service both hosted on-premise behind firewalls can communicate via a Cloud Service Bus Endpoint (URL).

    Creating Issuer credentials was an easy and straight forward way to ensure the Service (its Endpoint in the cloud) was only accessible by Clients with the correct credentials, preventing the possibility of just any Tom, Dick and Harry accessing the Service.

    That concludes this guide to getting started with Windows Azure AppFabric LABS Portal using the Echo code sample.

    Creating a Windows Azure Appfabric Labs Account

    1) Go to Windows AppFabric Labs Portal Web page and sign into Portal using your Live ID (sign up for a Live ID Account if you dont already have one first, this can be done on the same page)

    https://portal.appfabriclabs.com/

    2) The first time you sign in you will be asked to create a Project. On the My Projects Page click create a project link. This takes you to the Sign Up page, enter a project name and click OK. You will then be taken to your new Project page, which lists your Project Id, subscription Id which will be 0 since the Labs Portal is FREE to use.

    3) Next create a service namespace under your new Project. You will need to create namespaces for your app's, more than one app can have the same namespace. Use Projects to group together common namespaces. On your Project page click Add Service Namespace link, it is on the bottom right of your project page.


    On the Create New Service Namespace page enter a name and then click Validate Name, your name has to be validated to ensure it is globally unique. In the select a region section you have only 1 choice - USA. Next Click Create to create the new namespace.


    You will then be taken back to Your Project page, at the bottom of this page you will see your new service namespace added to the project.


    In the next blog I will go through how to run the Echo code sample C# version , which can be found in the AppFabricSamples\ServiceBus\Getting Started folder of the WinAzureAppFabricSDKSamplesV1C# download. The samples are configured to run using Windows Azure AppFabric Web Portal (subscription accounts) and NOT for the FREE Windows AppFabric Labs Portal . In order to successfully run Echo, using the FREE Labs Portal, you'll need to do some configuration work in your own environment and in the Access Control Service section of your Windows AppFabric Labs Portal Account.

    Windows Azure Access Control Service Samples and Documentation

    There is a September 2010 Labs release of Access Control Service ACS at the following link http://acs.codeplex.com/ . This ACS samples and documentation project is intended to be used with an Azure AppFabric labs portal account. The above link takes you to the home page which lists the key features of ACS.

    There is a getting started section http://acs.codeplex.com/wikipage?title=Getting%20Started&referringTitle=Home if you want to dive right in, starting with creating an ACS namespace, adding identity providers, setup relying party, create rules, define signing credentials and integrate with Visual Studio.  

    Working with the Management Portal page http://acs.codeplex.com/wikipage?title=Working%20with%20the%20Management%20Portal&referringTitle=Documentation , this documentation covers managing ACS configuration. Provides step by step instructions on how to work with the various ACS resources available in the management portal.

    A videos walkthrough page is available at http://acs.codeplex.com/wikipage?title=Videos&referringTitle=Home .

    The download ACS samples page http://acs.codeplex.com/releases/view/53011 .  The readme's for the samples http://acs.codeplex.com/wikipage?title=Samples .

    The prerequisites page can be found here http://acs.codeplex.com/wikipage?title=Prerequisites&referringTitle=Home , Visual Studio 2010 any edition, .NET4 or 3.5 SP1, WIF Runtime and SDK are among the requirements.

    Windows Azure AppFabric

    For an good introduction to Service Bus and Access Control check out the following link

    http://www.microsoft.com/windowsazure/appfabric/#appfablabs

    Windows Azure AppFabric SDK (Sept 2010 UPDATE) download can be found at

    http://www.microsoft.com/downloads/en/details.aspx?FamilyID=39856a03-1490-4283-908f-c8bf0bfad8a5&displaylang=en

    32bit and 64bit SDK versions are available.  Also, code samples for VB & C# and AppFabricDocs. The docs download is blocked for security, so once you have downloaded the docs, right click the docs file, select properties, click unblock then click Apply and OK. The docs can be read offline.

    Windows Azure AppFabric Labs (Aug 2010 UPDATE) download can be found at

    http://www.microsoft.com/downloads/en/details.aspx?FamilyID=D89640FC-C552-446E-AEAD-B1E0D940F31B

    There are 2 files to download, the Service Bus.config.txt file and  release notes(html) file. There is no SDK to download here, you need to download and install the win. Azure AppFabric SDK.

    Windows Azure AppFabric ACM.EXE and ACMBrowser

    ACM.exe is an Azure AppFabric Access Control Management Tool, it is a command line tool for performing management operations on Azure AppFabric Access Control resources that reside on Azure cloud. ACMBrowser is a WPF GUI version.

    When you need to create, update and delete Access Control resources these tools can be run on local machines, once you have made the necessary changes, the changes can be saved to the cloud. Both tools communicate with the Access Control Management Service in Azure, saving you from having to sign in to your portal account everytime.

    Currently these tools do not work if you have an Azure AppFabric Labs Portal Account, they are intended for Azure AppFabric Portal Account holders. 

    The Acm.exe tool can be found in the Azure AppFabric SDK download in the \Tools folder.

    Before you can utilize this tool you need to add a management key (can be found on the service namespace page), and the service namespace you are using, to the Acm.exe.config file. The Acm.exe.config file can be found in the  \Tools folder of the Win Azure AppFabric SDK download.

    When you open the Acm.exe.config file, it contains the following-


    <?xml version="1.0" encoding="utf-8" ?>

    <configuration>

      <appSettings>

        <add key="host" value="accesscontrol.windows.net"/>

        <add key="service" value=""/>

        <add key="mgmtkey" value=""/>

      </appSettings>

    </configuration>


    Creating an Access Control resource such as an Issuer using the Acm.exe tool, open a command window, change directory to the ProgramFiles\...AppFabric SDK\V1.0\Tools.

    To create an Issuer credential called owner, enter the following:

          acm create issuer -name:owner -issuername:(enter a display name here) -autogeneratekey

    If all goes well an ID and the object was created successfully will be displayed.

    The GUI Tool ACMBrowser can be found in your AppFabricSamplesSDK download, go to the following directory

         AppFabricSamples\AccessControl\ExploringFeatures\Management\AcmBrowser

    Build and run AcmBrowser solution in Visual Studio.

    Wednesday, October 20, 2010

    Microsoft TechEd Australia Aug 2010 Videos

    Sessions are now available to view online.

    Win Azure Platform AppFabric Overview (74 mins)
     http://www.msteched.com/2010/Australia/COS230


    The Business of Cloud Computing (76 mins)- cloud based PaaS and SaaS
    http://www.msteched.com/2010/Australia/ARC206

    Cloud Secret Sauce and what you can cook with it (72 mins)

    http://www.msteched.com/2010/Australia/ARC203

    Azure in the Real World Concept to Cloud (62mins) - what makes a good cloud app
    http://www.msteched.com/2010/Australia/VOC206


    Cloud Oriented Architecture in a retail business scenario (60 mins) - how to leverage azure appfabric service bus to connect together different areas of a retail business
    http://www.msteched.com/2010/Australia/ARC205

    Win Server AppFabric:Simplifiying the life of WCF WF Dev's (65 mins) - build config free WCF services using .Net, config and manage services using AppFabric Hosting Services
    http://www.msteched.com/2010/Australia/DEV322

    How do you secure cloud? (70 mins) - demistifying cloud security

    http://www.msteched.com/2010/Australia/SEC308

    WCF, HTTP Server API, Namespace Reservations and Access Control List

    Http server API or Http.sys is a kernel mode http driver with port sharing capabilities which means more than one application can listen on the same port.

    Http server API enables applications to communicate over http, applications can register to receive http requests for specified URL's and send http responses. An application not hosted in IIS and in a non-administrator account cannot bind to the http namespace at run time without an administrator reserving the namespace. This is a requirement of http.sys.

    A http namespace reservation allocates a part of the URL namespace to a user (or users), allowing the user to own that part of the namespace. An administrator can make this reservation for a specified URL on behalf of a user and their application. The application is then registered to receive and serve incoming service requests for the URL namespace .

    The http server API does not allow users to register URL's from parts of the namespace they do not own. For namespace security ACL's (access control list) are applied to the part of the namespace reserved for each user.

    Netsh.exe tool is used when manually configuring WCF using http/s. In windows 7 from an administrator account, to give a WCF web service called httpEchoService access rights to the namespace, launch a command window and enter the following


    netsh http add urlacl url=http://+:80/httpEchoService/ user=<your local machine name>


    A reservation has now been made for the specified URL, this allows the application to bind to the http namespace at run time.

    A hierarchical structure is used with namespace reservations. If the following namespace 'http://anyname.com:80/' is reserved, so are all the subnamespaces, for eg.
    'http://anyname.com:80/app1' is a reserved subnamespace.

    When using Microsoft Visual Studio, to enable users without administrator privileges to develop WCF web services, an ACL is created for the following namespace http://+:8731/Design_Time_Addresses during installation of Visual Studio.

    Administrators can add/remove users from this ACL, or open additional ports. This ACL allows users access to the WCF service auto host (wcfsvchost.exe) without granting them administrator privileges.

    For more information on OS's, tools and commands see this link
    http://msdn.microsoft.com/en-us/library/ms733768.aspx

    More information on namespace reservations can be found at 
    http://msdn.microsoft.com/en-us/library/aa364673%28VS.85%29.aspx%20

    Wednesday, October 13, 2010

    Free Windows Azure Platform Book

    Windows Azure Platform: Articles from the trenches vol.1 was written by 15 developers sharing their experiences of the platform, combining 20 articles ranging from getting started to best practices. The book can be viewed on-line at:

    http://www.slideshare.net/ericnelson/windows-azure-platform-articles-from-the-trenches-volume-one

    or can be purchased as a paperback.

    Chapter 1: Getting started with Win Azure covers creating an account, creating, packaging and deploying an application plus best tools to use.

    Chapter 2: Architecting for Azure covers principles, cost, risk, development and test environment and running java code on Windows Azure.

    Chapter 3: Windows Azure covers scaling, blob storage, queries and tables, worker roles, logging and health monitoring and roles.

    Chapter 4: SQL Azure goes through process of creating an account, using sql portal and creating a DB.

    Chapter 5: Windows Azure Platform AppFabric covers real time tracing of Azure roles.

    Fiddler 2, WCF and .NET

    If you are developing WCF web services using ASP.NET Development Server (runs asp.net app's locally) and you are using localhost, Fiddler will not be able to monitor any request/response traffic. Fiddler is bypassed if localhost is used.

    Fiddler and Firefox

    In Windows XP using .NET 3.5 VS2008 running a WCF REST web service (created in an ASP.NET Web App Project) you only need to replace localhost with your local machine name (a.k.a computer name), and Fiddler will monitor any requests to this service and the resulting response. Machine name can be found by right clicking 'My Computer' then selecting properties. Replacing localhost with your machine name only needs to be done on the client side (Firefox browser in this case). With an address like this

    http://localhost:1355/MyService.svc/

    replace localhost with your local machine name

    http://machinename:1355/MyService.svc/

    Fiddler will now display request/response information.

    Fiddler and Internet Explorer

    In Windows 7 running the same service mentioned above Fiddler can be used to monitor traffic by adding '.' (a full stop) to the end of localhost in your IE url, for eg

    http://localhost.:1355/MyService.svc/

    Fiddler will not be bypassed and requests made using IE will be picked up together with any resulting responses.

    Just Fiddler

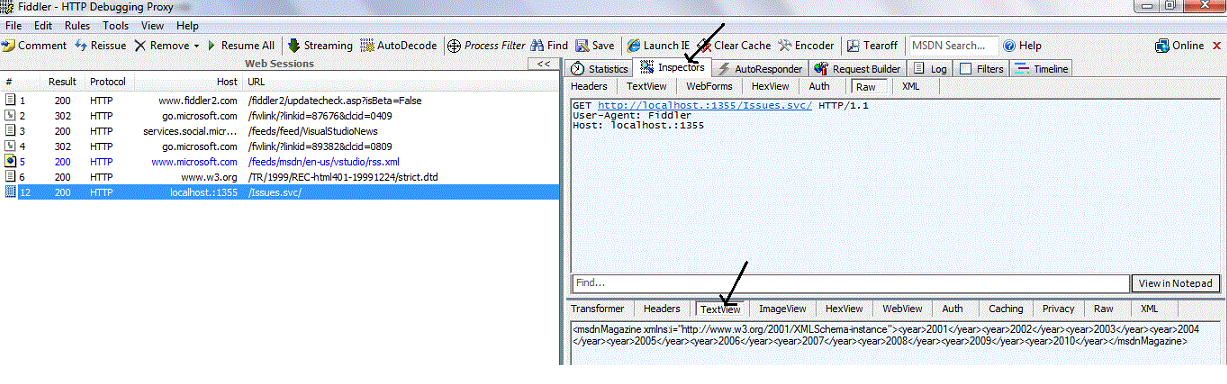
    In addition to using Firefox or IE as a webclient you can also use Fiddler, click the RequestBuilder tab to enter urls.  Enter a url in the textbox beneath the request builder tab.

    The url you enter will appear in the left window.


    Once you click on the matching url in the left window, it will be highlighted blue. Select the Inspectors tab from the menu of the top right window. The top right window displays request information, the bottom right window displays responses sent back by the service. Select the Textview tab from the menu in the bottom right window, the web service response will be displayed.


     To make a post method request to a REST web service using Fiddler, enter the url then select Post method from drop down list.


    In the Request Body window enter the values of your complex type object.


    Thursday, August 5, 2010

    What is a WSDL document

    A Web Services Description Language (WSDL) contains detailed information about how to access a Web Service.  A WSDL contains information such as the operations, parameters and return values.  The contents of WSDL are in XML format.

    More information on WSDL is found at the following resources.
    WSDL 1.1 specification: http://www.w3.org/TR/wsdl
    WSDL 2.0 specification: http://www.w3.org/TR/wsdl20
    WSDL 2.0 primer: http://www.w3.org/TR/wsdl20-primer


    WSDL Elements
    WSDL document contains the following main elements:

    Definitions
    This is the root element of the WSDL document.  This contains a set of namespace declarations i.e. xmlns:prefix attributes.  Each namespace prefix is bound to a URI.  The name attribute names this WSDL document as AmazonSearch shown below. The targetNamespace attribute is similar to an XML Schema definition’s targetNamespace.  The names declared within this WSDL document are in the http://soap.amazon.com namespace.
    A WSDL from Amazon contains the following attributes.

    <wsdl:definitions xmlns:typens="http://soap.amazon.com"
        xmlns:xsd="http://www.w3.org/2001/XMLSchema"
        xmlns:soap="http://schemas.xmlsoap.org/wsdl/soap/"
        xmlns:soapenc="http://schemas.xmlsoap.org/soap/encoding/"
        xmlns:wsdl="http://schemas.xmlsoap.org/wsdl/"
        xmlns="http://schemas.xmlsoap.org/wsdl/"
        targetNamespace="http://soap.amazon.com"
        name="AmazonSearch">


    Types
    Data types used by the service are described by XML Schema.
    An example:

    <wsdl:types>
        <schema xmlns="" xmlns:xsd="http://www.w3.org/2001/XMLSchema"
            targetNamespace="http://MyCompany/MyProductService">
        <element name=”ProductName” " type="s:string" />
        <element name="Quantity" type="s:int" />
       </schema>
    <wsdl:types>


    A more complex example from Amazon:

    <wsdl:types>
        <xsd:schema xmlns="" xmlns:xsd="http://www.w3.org/2001/XMLSchema"
            targetNamespace="http://soap.amazon.com">
        <xsd:complexType name="KeywordRequest">
            <xsd:all>
                    <xsd:element name="keyword" type="xsd:string"/>
                    <xsd:element name="page" type="xsd:string"/>
                    <xsd:element name="mode" type="xsd:string"/>
                    <xsd:element name="tag" type="xsd:string"/>
                    <xsd:element name="type" type="xsd:string"/>
                    <xsd:element name="devtag" type="xsd:string"/>
                    <xsd:element name="sort" type="xsd:string" minOccurs="0"/>
                    <xsd:element name="variations" type="xsd:string" minOccurs="0"/>
                    <xsd:element name="locale" type="xsd:string" minOccurs="0"/>
                </xsd:all>
            </xsd:complexType>
            <xsd:complexType name="ProductInfo">
                <xsd:all>
                    <xsd:element name="TotalResults" type="xsd:string" minOccurs="0"/>
                    <!-- Total number of Search Results -->
                    <xsd:element name="TotalPages" type="xsd:string" minOccurs="0"/>
                    <!-- Total number of Pages of Search Results -->
                    <xsd:element name="ListName" type="xsd:string" minOccurs="0"/>
                    <!-- Listmania list name -->
                    <xsd:element name="Details" type="typens:DetailsArray" minOccurs="0"/>
                </xsd:all>
            </xsd:complexType>
        </xsd:schema>
    </wsdl:types>


    Message
    Defines input parameters and result of a service operation.  The part element refers to a data type.

    <message name="KeywordSearchRequest">
        <part name="KeywordSearchRequest" type="typens:KeywordRequest"/>
    </message>
    <message name="KeywordSearchResponse">
        <part name="return" type="typens:ProductInfo"/>
    </message>


    Port Type
    Defines the operations and messages used.

    <portType name="AmazonSearchPort">
        <operation name="KeywordSearchRequest">
            <input message="typens:KeywordSearchRequest"/>
            <output message="typens:KeywordSearchResponse"/>
        </operation>
    </portType>


    Binding
    Protocols used and message format is defined by the binding.
    Note the attribute type is the portType.  The name attribute must be unique.

    <binding name="AmazonSearchBinding" type="typens:AmazonSearchPort">
        <soap:binding style="rpc" transport="http://schemas.xmlsoap.org/soap/http"/>
        <!-- Binding for Amazon Web APIs - RPC, SOAP over HTTP -->
        <operation name="KeywordSearchRequest">
            <soap:operation soapAction="http://soap.amazon.com"/>
            <input>
                <soap:body use="encoded" encodingStyle="http://schemas.xmlsoap.org/soap/encoding/" namespace="http://soap.amazon.com"/>
            </input>
            <output>
                <soap:body use="encoded" encodingStyle="http://schemas.xmlsoap.org/soap/encoding/" namespace="http://soap.amazon.com"/>
            </output>
        </operation>
    </binding>


    Service
    Groups a set of related port elements (endpoints), each specifying a binding with a corresponding address.
    The following specifies Amazon’s AmazonSearchService located at the URL address http://soap.amazon.com/onca/soap2.

    <service name="AmazonSearchService">
        <!-- Endpoint for Amazon Web APIs -->
        <port name="AmazonSearchPort" binding="typens:AmazonSearchBinding">
            <soap:address location="http://soap.amazon.com/onca/soap2"/>
        </port>
    </service>


    Operation
    Operation describes a service action.  Two main sections in a WSDL document  containing  operation information.
    PortType section:

    <operation name="KeywordSearchRequest">
       <input message="typens:KeywordSearchRequest"/>
       <output message="typens:KeywordSearchResponse"/>
    </operation>


    Binding section:

    <operation name="KeywordSearchRequest">
        <soap:operation soapAction="http://soap.amazon.com"/>
        <input>
            <soap:body use="encoded" encodingStyle="http://schemas.xmlsoap.org/soap/encoding/" namespace="http://soap.amazon.com"/>
        </input>
        <output>
            <soap:body use="encoded" encodingStyle="http://schemas.xmlsoap.org/soap/encoding/" namespace="http://soap.amazon.com"/>
        </output>
    </operation>


    Port
    Port specifies an endpoint at a particular address for a binding.  Only one address can be specified.

    <!-- Endpoint for Amazon Web APIs -->
    <port name="AmazonSearchPort" binding="typens:AmazonSearchBinding">
        <soap:address location="http://soap.amazon.com/onca/soap2"/>
    </port>


    WSDL Structure
    The following defines how the above elements fit together to form a WSDL 1.1 structure.

    <definitions>
        <types> </types>
        <message>
            <part> </part>
        </message>
        <portType>
            <operation>
                <input> </input>
                <output> </output>
                <fault> </fault>
            </operation>
        </portType>
        <binding>
            <operation> </operation>
        </binding>
        <service>
            <port> </port>
        </service>
    <definitions>