A good introduction to Windows Azure can be found at the following link
http://msdn.microsoft.com/en-us/library/ff803364.aspx
The Windows Azure SDK download (Sept 2010 UPDATE) is available here
http://www.microsoft.com/downloads/en/details.aspx?FamilyID=21910585-8693-4185-826E-E658535940AA
The SDK includes an off-line test environment called 'Developer Fabric', it is a simulation of Azure(Cloud Fabric), the subscription based production environment running in Microsoft's data centers. The SDK provides dev's with APIs, tools, docs and code samples to help develop app's on Win Azure.
Also available to download is Win Azure Tools for MS Visual Studio(ver.1.2 June 2010)
http://www.blogger.com/%20http://www.microsoft.com/downloads/en/details.aspx?FamilyID=2274a0a8-5d37-4eac-b50a-e197dc340f6f&displaylang=en#SystemRequirements
This download includes Windows Azure SDK and can be used with VS2008 & VS2010. Dev's can create, configure, build, debug, run, package and deploy scalable web app's and services.
There are some known issues/bugs in this SDK, some fixes can be found at
http://code.msdn.microsoft.com/wcfazure/Wiki/View.aspx?title=KnownIssues
A Windows Azure training kit is available to download, it comes with hands-on labs, presentations and demos designed to help you learn how to use Win Azure, SQL Azure and AppFabric. The June 2010 release includes new and updated labs for VS2010.
http://www.microsoft.com/downloads/en/details.aspx?FamilyID=413E88F8-5966-4A83-B309-53B7B77EDF78&displayLang=en
Web Developer Portals
There are 4 portals associated with Windows Azure platform, 3 are subscription based the other is free to use. A windows Live ID is required to sign-in to these portals, you can sign-up for a Live ID on any one of the portal sign-in pages.
1)Windows Azure Web Dev Portal - Subscription required, app's and services are uploaded to the cloud and are accessable as hosted services. Can be found at http://windows.azure.com/
2)SQL Azure Web Portal - Subscription required, data stored in the cloud. Can be found at http://sql.azure.com/
3)Windows Azure AppFabric Web Dev Portal - Subscription required, use Service Bus and Access Control. Found at http://appfabric.azure.com/
4)Windows Azure AppFabric LABS Web Portal - FREE, test environment for developing against the AppFabric Service Bus. Found at https://portal.appfabriclabs.com/
Thursday, October 21, 2010
"How Do I?" Video Series for Windows Azure Platform
A series of short videos covering Windows Azure, Azure Service Bus and SQL Azure can be found at:
http://msdn.microsoft.com/en-gb/windowsazure/ff798080.aspx
The videos duration ranges from 6 minutes to 75 minutes in length.
For videos in this series covering Azure AppFabric -
Get started with Azure Service Bus (24 minutes in length) covers signing up, creating projects, namespaces and service remoting via the service bus environment.
http://msdn.microsoft.com/en-gb/windowsazure/ff181517.aspx
Get started with Access Control Services (26 mins) covers authentication and authorization of WCF web services in the cloud.
http://msdn.microsoft.com/en-gb/windowsazure/ee943797.aspx
Create and use a service bus message buffer (22 mins) covers sending and receiving (simple text based and complex custom types) messages using a cloud message queuing system.
http://msdn.microsoft.com/en-gb/windowsazure/ee943810.aspx
Windows Azure Platform On Demand Webcasts
For a list of recent webcasts covering Windows Azure Platform see the following link:
http://www.microsoft.com/events/series/azure.aspx?tab=webcasts&id=odall
No signing in is required to watch these webcasts.
Some Windows Azure AppFabric webcasts from the link above -
Introduction to Windows Azure AppFabric (Level 200) 61 minutes, Aug 2010
Developing for Windows Azure AppFabric Service Bus (Level 300) 53 minutes, Sept 2010
Securing Web Resources Using Windows Azure AppFabric Access Control (Level 300) 55 minutes, Aug 2010
Communication Patterns Supported by Windows Azure Platform AppFabric (Level 200) 60 minutes, Oct 2009
Microsoft TechEd North America June 2010 Videos
Sharepoint and Azure (60 minutes)
http://www.msteched.com/2010/NorthAmerica/OSP213
Real World Patterns for Cloud Computing (68 minutes)- covers examples of cloud architectures
http://www.msteched.com/2010/NorthAmerica/ARC304
Securing the Cloud - Expert Panel (72 minutes)
http://www.msteched.com/2010/NorthAmerica/SIA332
Lap Around the Windows Azure Platform (75 minutes)
http://www.msteched.com/2010/NorthAmerica/COS303
The Economics of Cloud Computing (67 minutes)- covers pricing model and SLA's
http://www.msteched.com/2010/NorthAmerica/COS306
Getting Started with a Windows Azure AppFabric Labs Account using the Echo code sample
In the following we will be using Echo Azure AppFabric SDK C# code sample, as our example application.
The Echo code sample can be found in the AppFabricSamples\ServiceBus\Getting Started folder of the WinAzureAppFabricSDKSamplesV1C# download.
Since these samples are intended to work using Windows Azure AppFabric Portal (subscription account) some configuration work is necessary in your environment and in the 'Access Control Service' section of your FREE Windows Azure AppFabric Labs Portal Account.
Assuming you have signed up for a FREE Windows Azure AppFabric LABS Portal Account, you have created a project and a service namespace (see the How to create a Windows Azure Labs portal account blog entry on how to accomplish this).
1) Windows Azure AppFabric SDK page, download SDK-x64 for 64bit OS or x86 for 32bit OS, SDK code samples and appfabric docs.
http://www.microsoft.com/downloads/en/details.aspx?FamilyID=39856a03-1490-4283-908f-c8bf0bfad8a5&displaylang=en
Install appropriate SDK.
2) Windows Azure AppFabric LABS SDK Aug 2010 download page which can be found here
http://www.microsoft.com/downloads/en/details.aspx?FamilyID=D89640FC-C552-446E-AEAD-B1E0D940F31B
There is no SDK to download here since you already have the Windows Azure AppFabric SDK downloaded and installed. Download Release Notes and ServiceBus.config.txt files.
RENAME ServiceBus.config.txt to ServiceBus.config
Paste ServiceBus.config in the following dir (if you have 64bit)
C:\Windows\Microsoft.Net\Framework64\v2.0.50727\CONFIG
If you're using 32bit then replace Framework64 with your 32bit folder.
3) Load the Echo code sample into VisualStudio. There are 2 projects in the solution both console app's, a WCF Service and a Client. Before you can run the app you need to create Issuer Credentials ie. an Issuer Name and Issuer Key(Issuer Secret). Later when you do run the app, run the service first, once its running start an instance of the Client, in the Client console you will be asked to enter some text to echo, the text you enter will then be echoed back by the Service.
The Service takes your Issuer credentials passes them directly to AppFabric's ACS, then an endpoint is opened on the Service Bus in the Cloud. In order for the Client to access this Service Bus endpoint, it must have permission to communicate with it. The Client also takes your Issuer credentials, authenticates with AppFabric ACS Service in the Cloud, and aquires an access token that proves to the service bus infrastructure that the Client is authorized to access this endpoint. Once the client is connected you can type messages into Client console window and you will see messages echoed back by the running Service.
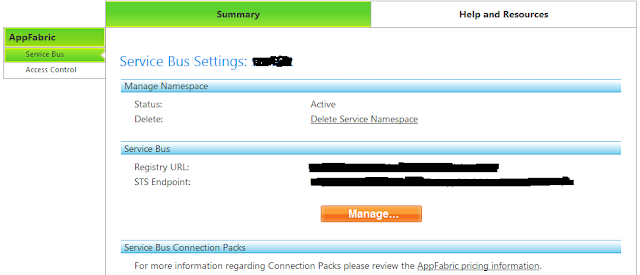
4) Next create an Issuer Name and Issuer Secret (key). Sign in to your LABS Portal Account, select the project you created, then decide which Service Namespace you wish to use with this app. Click on the SERVICE BUS link of the service namespace you've chosen. The screen below is where you should be now, click orange Manage button to go to ACS Management Portal where you will create your new Issuer Credentials.
Access Control Service is the next screen you will see, select Identity Providers (Step 1), the Echo app uses a very simple straight forward approach for dealing with authorization and authentication.
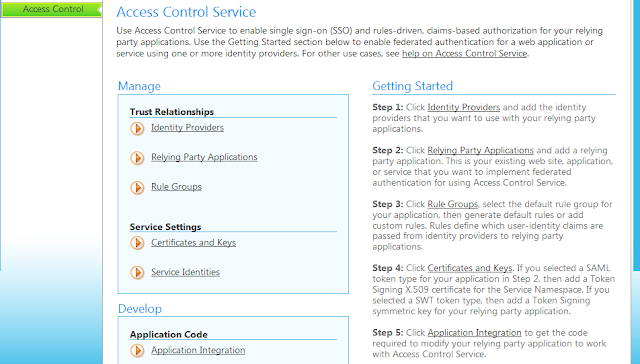
On the Identity Providers page select Service Identities

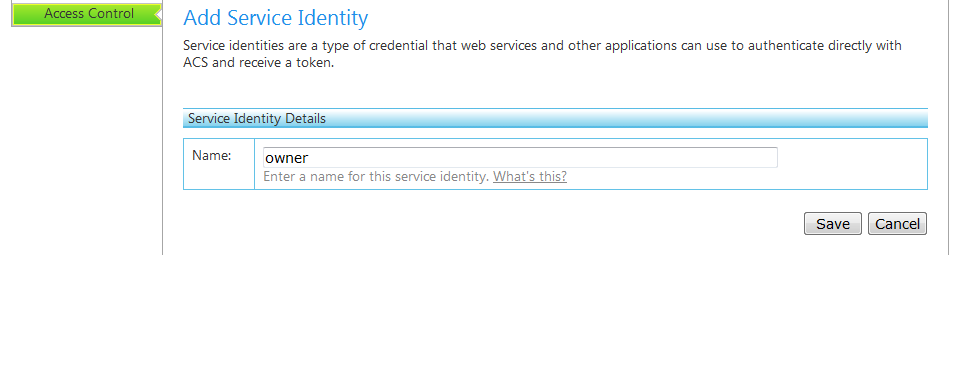
On the Service Identities page, we will create an Issuer Name and Key. Select Add Service Identity.

Enter owner as the Name, its the default name used by Microsoft, then press Save.
 Next click Add Credential.

On the Add Credential page enter owner as display name, for Type select Symmetric Key (this is your Issuer key/Issuer Secret). Press the Generate button to create key, then press Save button.
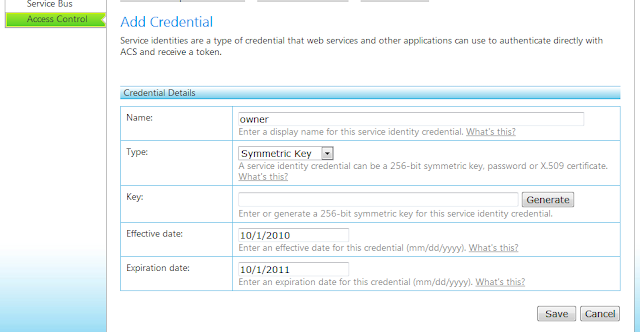
You now have a new Issuer Name(owner) and Key. Under Credentials hover over your new Issuer(owner), the line will turn a blue colour, click on to blue line to see your full Issuer details, this takes you to the Edit Credential page.
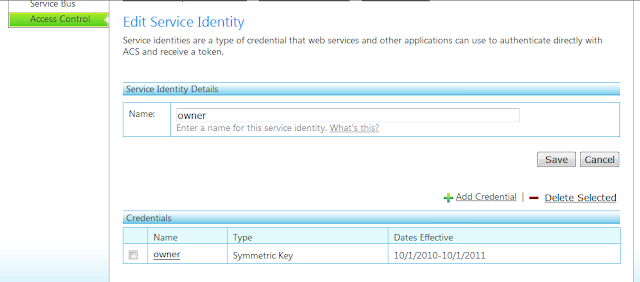
The Edit Credential page looks the same as the Add Credential page (see second image above). Click on the Service Identities link, it is just above the Edit Credential title near the top of this page. This will take you to the main Service Identities page which list all the Identities created including your new Issuer(owner) credential.
 This completes step 4. Next we go back to Visual Studio and the Echo app example.
5) In Visual Studio expand Client project, open Program.cs. Comment out the following code lines as shown below.
/* Console.Write("Your Service Namespace: ");
string serviceNamespace = Console.ReadLine();
Console.Write("Your Issuer Name: ");
string issuerName = Console.ReadLine();
Console.Write("Your Issuer Secret: ");
string issuerSecret = Console.ReadLine(); */
Directly underneath add the following 3 lines of code. Enter your own service namespace (the one you created your Issuer Credentials under) and then enter your Issuer Key ( issuerSecret), this was generated for you.
string serviceNamespace = " "; //add your service namespace here
string issuerName = "owner";
string issuerSecret = " "; //add your generated key here
Make the above code changes in the Service project of your solution as well. Save changes and Build Solution.
Press F5 to start, the Service Command Window will open, it may seem to be slow, but give the Service time to establish a connection to the Service Bus, things will run faster after initial connection is made. Once you see your service bus URL on the first line and press enter to exit appear on the second line, the Service is up and running.
While the Echo service is running you can see it publicly listed from your LABS Portal Account. Go to the Service Bus section of your service namespace, under the Service Bus title click Registry URL (see first image under Step 4)). In the image below you can see an Echo Service listed, once you stop your Service running it will no longer appear there.
 Run an instance of your Client, right click Client project name, select debug then select start new instance. Another command window will open, you will be asked to enter some text, when you do it will be echoed in the Service command window.
The Echo code sample is a simple introduction to service remoting. A Client and a Service both hosted on-premise behind firewalls can communicate via a Cloud Service Bus Endpoint (URL).
Creating Issuer credentials was an easy and straight forward way to ensure the Service (its Endpoint in the cloud) was only accessible by Clients with the correct credentials, preventing the possibility of just any Tom, Dick and Harry accessing the Service.
That concludes this guide to getting started with Windows Azure AppFabric LABS Portal using the Echo code sample.
The Echo code sample can be found in the AppFabricSamples\ServiceBus\Getting Started folder of the WinAzureAppFabricSDKSamplesV1C# download.
Since these samples are intended to work using Windows Azure AppFabric Portal (subscription account) some configuration work is necessary in your environment and in the 'Access Control Service' section of your FREE Windows Azure AppFabric Labs Portal Account.
Assuming you have signed up for a FREE Windows Azure AppFabric LABS Portal Account, you have created a project and a service namespace (see the How to create a Windows Azure Labs portal account blog entry on how to accomplish this).
1) Windows Azure AppFabric SDK page, download SDK-x64 for 64bit OS or x86 for 32bit OS, SDK code samples and appfabric docs.
http://www.microsoft.com/downloads/en/details.aspx?FamilyID=39856a03-1490-4283-908f-c8bf0bfad8a5&displaylang=en
Install appropriate SDK.
2) Windows Azure AppFabric LABS SDK Aug 2010 download page which can be found here
http://www.microsoft.com/downloads/en/details.aspx?FamilyID=D89640FC-C552-446E-AEAD-B1E0D940F31B
There is no SDK to download here since you already have the Windows Azure AppFabric SDK downloaded and installed. Download Release Notes and ServiceBus.config.txt files.
RENAME ServiceBus.config.txt to ServiceBus.config
Paste ServiceBus.config in the following dir (if you have 64bit)
C:\Windows\Microsoft.Net\Framework64\v2.0.50727\CONFIG
If you're using 32bit then replace Framework64 with your 32bit folder.
3) Load the Echo code sample into VisualStudio. There are 2 projects in the solution both console app's, a WCF Service and a Client. Before you can run the app you need to create Issuer Credentials ie. an Issuer Name and Issuer Key(Issuer Secret). Later when you do run the app, run the service first, once its running start an instance of the Client, in the Client console you will be asked to enter some text to echo, the text you enter will then be echoed back by the Service.
The Service takes your Issuer credentials passes them directly to AppFabric's ACS, then an endpoint is opened on the Service Bus in the Cloud. In order for the Client to access this Service Bus endpoint, it must have permission to communicate with it. The Client also takes your Issuer credentials, authenticates with AppFabric ACS Service in the Cloud, and aquires an access token that proves to the service bus infrastructure that the Client is authorized to access this endpoint. Once the client is connected you can type messages into Client console window and you will see messages echoed back by the running Service.
4) Next create an Issuer Name and Issuer Secret (key). Sign in to your LABS Portal Account, select the project you created, then decide which Service Namespace you wish to use with this app. Click on the SERVICE BUS link of the service namespace you've chosen. The screen below is where you should be now, click orange Manage button to go to ACS Management Portal where you will create your new Issuer Credentials.

Access Control Service is the next screen you will see, select Identity Providers (Step 1), the Echo app uses a very simple straight forward approach for dealing with authorization and authentication.
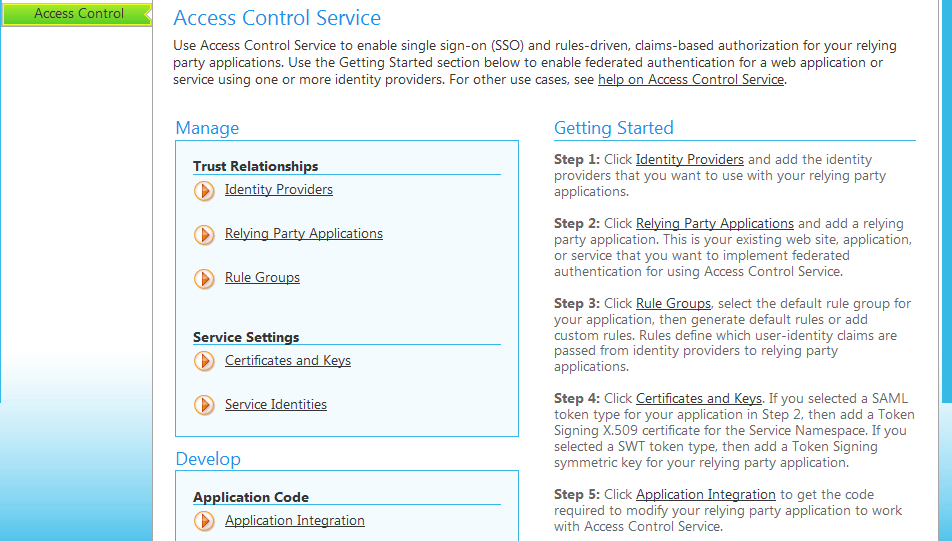
On the Identity Providers page select Service Identities

On the Service Identities page, we will create an Issuer Name and Key. Select Add Service Identity.

Enter owner as the Name, its the default name used by Microsoft, then press Save.

On the Add Credential page enter owner as display name, for Type select Symmetric Key (this is your Issuer key/Issuer Secret). Press the Generate button to create key, then press Save button.

You now have a new Issuer Name(owner) and Key. Under Credentials hover over your new Issuer(owner), the line will turn a blue colour, click on to blue line to see your full Issuer details, this takes you to the Edit Credential page.
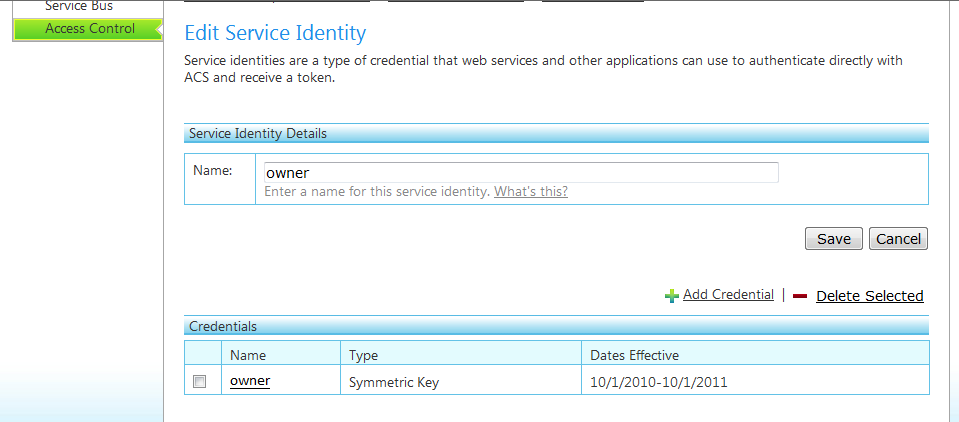
The Edit Credential page looks the same as the Add Credential page (see second image above). Click on the Service Identities link, it is just above the Edit Credential title near the top of this page. This will take you to the main Service Identities page which list all the Identities created including your new Issuer(owner) credential.

5) In Visual Studio expand Client project, open Program.cs. Comment out the following code lines as shown below.
/* Console.Write("Your Service Namespace: ");
string serviceNamespace = Console.ReadLine();
Console.Write("Your Issuer Name: ");
string issuerName = Console.ReadLine();
Console.Write("Your Issuer Secret: ");
string issuerSecret = Console.ReadLine(); */
Directly underneath add the following 3 lines of code. Enter your own service namespace (the one you created your Issuer Credentials under) and then enter your Issuer Key ( issuerSecret), this was generated for you.
string serviceNamespace = " "; //add your service namespace here
string issuerName = "owner";
string issuerSecret = " "; //add your generated key here
Make the above code changes in the Service project of your solution as well. Save changes and Build Solution.
Press F5 to start, the Service Command Window will open, it may seem to be slow, but give the Service time to establish a connection to the Service Bus, things will run faster after initial connection is made. Once you see your service bus URL on the first line and press enter to exit appear on the second line, the Service is up and running.
While the Echo service is running you can see it publicly listed from your LABS Portal Account. Go to the Service Bus section of your service namespace, under the Service Bus title click Registry URL (see first image under Step 4)). In the image below you can see an Echo Service listed, once you stop your Service running it will no longer appear there.

The Echo code sample is a simple introduction to service remoting. A Client and a Service both hosted on-premise behind firewalls can communicate via a Cloud Service Bus Endpoint (URL).
Creating Issuer credentials was an easy and straight forward way to ensure the Service (its Endpoint in the cloud) was only accessible by Clients with the correct credentials, preventing the possibility of just any Tom, Dick and Harry accessing the Service.
That concludes this guide to getting started with Windows Azure AppFabric LABS Portal using the Echo code sample.
Creating a Windows Azure Appfabric Labs Account
1) Go to Windows AppFabric Labs Portal Web page and sign into Portal using your Live ID (sign up for a Live ID Account if you dont already have one first, this can be done on the same page)
https://portal.appfabriclabs.com/
2) The first time you sign in you will be asked to create a Project. On the My Projects Page click create a project link. This takes you to the Sign Up page, enter a project name and click OK. You will then be taken to your new Project page, which lists your Project Id, subscription Id which will be 0 since the Labs Portal is FREE to use.
3) Next create a service namespace under your new Project. You will need to create namespaces for your app's, more than one app can have the same namespace. Use Projects to group together common namespaces. On your Project page click Add Service Namespace link, it is on the bottom right of your project page.

On the Create New Service Namespace page enter a name and then click Validate Name, your name has to be validated to ensure it is globally unique. In the select a region section you have only 1 choice - USA. Next Click Create to create the new namespace.

You will then be taken back to Your Project page, at the bottom of this page you will see your new service namespace added to the project.

In the next blog I will go through how to run the Echo code sample C# version , which can be found in the AppFabricSamples\ServiceBus\Getting Started folder of the WinAzureAppFabricSDKSamplesV1C# download. The samples are configured to run using Windows Azure AppFabric Web Portal (subscription accounts) and NOT for the FREE Windows AppFabric Labs Portal . In order to successfully run Echo, using the FREE Labs Portal, you'll need to do some configuration work in your own environment and in the Access Control Service section of your Windows AppFabric Labs Portal Account.
Windows Azure Access Control Service Samples and Documentation
There is a September 2010 Labs release of Access Control Service ACS at the following link http://acs.codeplex.com/ . This ACS samples and documentation project is intended to be used with an Azure AppFabric labs portal account. The above link takes you to the home page which lists the key features of ACS.
There is a getting started section http://acs.codeplex.com/wikipage?title=Getting%20Started&referringTitle=Home if you want to dive right in, starting with creating an ACS namespace, adding identity providers, setup relying party, create rules, define signing credentials and integrate with Visual Studio.
Working with the Management Portal page http://acs.codeplex.com/wikipage?title=Working%20with%20the%20Management%20Portal&referringTitle=Documentation , this documentation covers managing ACS configuration. Provides step by step instructions on how to work with the various ACS resources available in the management portal.
A videos walkthrough page is available at http://acs.codeplex.com/wikipage?title=Videos&referringTitle=Home .
The download ACS samples page http://acs.codeplex.com/releases/view/53011 . The readme's for the samples http://acs.codeplex.com/wikipage?title=Samples .
The prerequisites page can be found here http://acs.codeplex.com/wikipage?title=Prerequisites&referringTitle=Home , Visual Studio 2010 any edition, .NET4 or 3.5 SP1, WIF Runtime and SDK are among the requirements.
Windows Azure AppFabric
For an good introduction to Service Bus and Access Control check out the following link
http://www.microsoft.com/windowsazure/appfabric/#appfablabs
Windows Azure AppFabric SDK (Sept 2010 UPDATE) download can be found at
http://www.microsoft.com/downloads/en/details.aspx?FamilyID=39856a03-1490-4283-908f-c8bf0bfad8a5&displaylang=en
32bit and 64bit SDK versions are available. Also, code samples for VB & C# and AppFabricDocs. The docs download is blocked for security, so once you have downloaded the docs, right click the docs file, select properties, click unblock then click Apply and OK. The docs can be read offline.
Windows Azure AppFabric Labs (Aug 2010 UPDATE) download can be found at
http://www.microsoft.com/downloads/en/details.aspx?FamilyID=D89640FC-C552-446E-AEAD-B1E0D940F31B
There are 2 files to download, the Service Bus.config.txt file and release notes(html) file. There is no SDK to download here, you need to download and install the win. Azure AppFabric SDK.
Windows Azure AppFabric ACM.EXE and ACMBrowser
ACM.exe is an Azure AppFabric Access Control Management Tool, it is a command line tool for performing management operations on Azure AppFabric Access Control resources that reside on Azure cloud. ACMBrowser is a WPF GUI version.
When you need to create, update and delete Access Control resources these tools can be run on local machines, once you have made the necessary changes, the changes can be saved to the cloud. Both tools communicate with the Access Control Management Service in Azure, saving you from having to sign in to your portal account everytime.
Currently these tools do not work if you have an Azure AppFabric Labs Portal Account, they are intended for Azure AppFabric Portal Account holders.
The Acm.exe tool can be found in the Azure AppFabric SDK download in the \Tools folder.
Before you can utilize this tool you need to add a management key (can be found on the service namespace page), and the service namespace you are using, to the Acm.exe.config file. The Acm.exe.config file can be found in the \Tools folder of the Win Azure AppFabric SDK download.
When you open the Acm.exe.config file, it contains the following-
Creating an Access Control resource such as an Issuer using the Acm.exe tool, open a command window, change directory to the ProgramFiles\...AppFabric SDK\V1.0\Tools.
To create an Issuer credential called owner, enter the following:
acm create issuer -name:owner -issuername:(enter a display name here) -autogeneratekey
If all goes well an ID and the object was created successfully will be displayed.
The GUI Tool ACMBrowser can be found in your AppFabricSamplesSDK download, go to the following directory
AppFabricSamples\AccessControl\ExploringFeatures\Management\AcmBrowser
Build and run AcmBrowser solution in Visual Studio.
When you need to create, update and delete Access Control resources these tools can be run on local machines, once you have made the necessary changes, the changes can be saved to the cloud. Both tools communicate with the Access Control Management Service in Azure, saving you from having to sign in to your portal account everytime.
Currently these tools do not work if you have an Azure AppFabric Labs Portal Account, they are intended for Azure AppFabric Portal Account holders.
The Acm.exe tool can be found in the Azure AppFabric SDK download in the \Tools folder.
Before you can utilize this tool you need to add a management key (can be found on the service namespace page), and the service namespace you are using, to the Acm.exe.config file. The Acm.exe.config file can be found in the \Tools folder of the Win Azure AppFabric SDK download.
When you open the Acm.exe.config file, it contains the following-
<?xml version="1.0" encoding="utf-8" ?>


<configuration>


  <appSettings>


    <add key="host" value="accesscontrol.windows.net"/>


    <add key="service" value=""/>


    <add key="mgmtkey" value=""/>


  </appSettings>


</configuration>
Creating an Access Control resource such as an Issuer using the Acm.exe tool, open a command window, change directory to the ProgramFiles\...AppFabric SDK\V1.0\Tools.
To create an Issuer credential called owner, enter the following:
acm create issuer -name:owner
If all goes well an ID and the object was created successfully will be displayed.
The GUI Tool ACMBrowser can be found in your AppFabricSamplesSDK download, go to the following directory
AppFabricSamples\AccessControl\ExploringFeatures\Management\AcmBrowser
Build and run AcmBrowser solution in Visual Studio.
Wednesday, October 20, 2010
Microsoft TechEd Australia Aug 2010 Videos
Sessions are now available to view online.
Win Azure Platform AppFabric Overview (74 mins)
http://www.msteched.com/2010/Australia/COS230
The Business of Cloud Computing (76 mins)- cloud based PaaS and SaaS
http://www.msteched.com/2010/Australia/ARC206
Cloud Secret Sauce and what you can cook with it (72 mins)
http://www.msteched.com/2010/Australia/ARC203
Azure in the Real World Concept to Cloud (62mins) - what makes a good cloud app
http://www.msteched.com/2010/Australia/VOC206
Cloud Oriented Architecture in a retail business scenario (60 mins) - how to leverage azure appfabric service bus to connect together different areas of a retail business
http://www.msteched.com/2010/Australia/ARC205
Win Server AppFabric:Simplifiying the life of WCF WF Dev's (65 mins) - build config free WCF services using .Net, config and manage services using AppFabric Hosting Services
http://www.msteched.com/2010/Australia/DEV322
How do you secure cloud? (70 mins) - demistifying cloud security
http://www.msteched.com/2010/Australia/SEC308
WCF, HTTP Server API, Namespace Reservations and Access Control List
Http server API or Http.sys is a kernel mode http driver with port sharing capabilities which means more than one application can listen on the same port.
Http server API enables applications to communicate over http, applications can register to receive http requests for specified URL's and send http responses. An application not hosted in IIS and in a non-administrator account cannot bind to the http namespace at run time without an administrator reserving the namespace. This is a requirement of http.sys.
A http namespace reservation allocates a part of the URL namespace to a user (or users), allowing the user to own that part of the namespace. An administrator can make this reservation for a specified URL on behalf of a user and their application. The application is then registered to receive and serve incoming service requests for the URL namespace .
The http server API does not allow users to register URL's from parts of the namespace they do not own. For namespace security ACL's (access control list) are applied to the part of the namespace reserved for each user.
Netsh.exe tool is used when manually configuring WCF using http/s. In windows 7 from an administrator account, to give a WCF web service called httpEchoService access rights to the namespace, launch a command window and enter the following
A reservation has now been made for the specified URL, this allows the application to bind to the http namespace at run time.
A hierarchical structure is used with namespace reservations. If the following namespace 'http://anyname.com:80/' is reserved, so are all the subnamespaces, for eg.
'http://anyname.com:80/app1' is a reserved subnamespace.
When using Microsoft Visual Studio, to enable users without administrator privileges to develop WCF web services, an ACL is created for the following namespace http://+:8731/Design_Time_Addresses during installation of Visual Studio.
Administrators can add/remove users from this ACL, or open additional ports. This ACL allows users access to the WCF service auto host (wcfsvchost.exe) without granting them administrator privileges.
For more information on OS's, tools and commands see this link
http://msdn.microsoft.com/en-us/library/ms733768.aspx
More information on namespace reservations can be found at
http://msdn.microsoft.com/en-us/library/aa364673%28VS.85%29.aspx%20
Http server API enables applications to communicate over http, applications can register to receive http requests for specified URL's and send http responses. An application not hosted in IIS and in a non-administrator account cannot bind to the http namespace at run time without an administrator reserving the namespace. This is a requirement of http.sys.
A http namespace reservation allocates a part of the URL namespace to a user (or users), allowing the user to own that part of the namespace. An administrator can make this reservation for a specified URL on behalf of a user and their application. The application is then registered to receive and serve incoming service requests for the URL namespace .
The http server API does not allow users to register URL's from parts of the namespace they do not own. For namespace security ACL's (access control list) are applied to the part of the namespace reserved for each user.
Netsh.exe tool is used when manually configuring WCF using http/s. In windows 7 from an administrator account, to give a WCF web service called httpEchoService access rights to the namespace, launch a command window and enter the following
netsh http add urlacl url=http://+:80/httpEchoService/ user=<your local machine name>A reservation has now been made for the specified URL, this allows the application to bind to the http namespace at run time.
A hierarchical structure is used with namespace reservations. If the following namespace 'http://anyname.com:80/' is reserved, so are all the subnamespaces, for eg.
'http://anyname.com:80/app1' is a reserved subnamespace.
When using Microsoft Visual Studio, to enable users without administrator privileges to develop WCF web services, an ACL is created for the following namespace http://+:8731/Design_Time_Addresses during installation of Visual Studio.
Administrators can add/remove users from this ACL, or open additional ports. This ACL allows users access to the WCF service auto host (wcfsvchost.exe) without granting them administrator privileges.
For more information on OS's, tools and commands see this link
http://msdn.microsoft.com/en-us/library/ms733768.aspx
More information on namespace reservations can be found at
http://msdn.microsoft.com/en-us/library/aa364673%28VS.85%29.aspx%20
Wednesday, October 13, 2010
Free Windows Azure Platform Book
Windows Azure Platform: Articles from the trenches vol.1 was written by 15 developers sharing their experiences of the platform, combining 20 articles ranging from getting started to best practices. The book can be viewed on-line at:
http://www.slideshare.net/ericnelson/windows-azure-platform-articles-from-the-trenches-volume-one
or can be purchased as a paperback.
Chapter 1: Getting started with Win Azure covers creating an account, creating, packaging and deploying an application plus best tools to use.
Chapter 2: Architecting for Azure covers principles, cost, risk, development and test environment and running java code on Windows Azure.
Chapter 3: Windows Azure covers scaling, blob storage, queries and tables, worker roles, logging and health monitoring and roles.
Chapter 4: SQL Azure goes through process of creating an account, using sql portal and creating a DB.
Chapter 5: Windows Azure Platform AppFabric covers real time tracing of Azure roles.
Fiddler 2, WCF and .NET
If you are developing WCF web services using ASP.NET Development Server (runs asp.net app's locally) and you are using localhost, Fiddler will not be able to monitor any request/response traffic. Fiddler is bypassed if localhost is used.
Fiddler and Firefox
In Windows XP using .NET 3.5 VS2008 running a WCF REST web service (created in an ASP.NET Web App Project) you only need to replace localhost with your local machine name (a.k.a computer name), and Fiddler will monitor any requests to this service and the resulting response. Machine name can be found by right clicking 'My Computer' then selecting properties. Replacing localhost with your machine name only needs to be done on the client side (Firefox browser in this case). With an address like this
replace localhost with your local machine name
http://machinename:1355/MyService.svc/
Fiddler will now display request/response information.
Fiddler and Internet Explorer
In Windows 7 running the same service mentioned above Fiddler can be used to monitor traffic by adding '.' (a full stop) to the end of localhost in your IE url, for eg
http://localhost.:1355/MyService.svc/
Fiddler will not be bypassed and requests made using IE will be picked up together with any resulting responses.
Just Fiddler
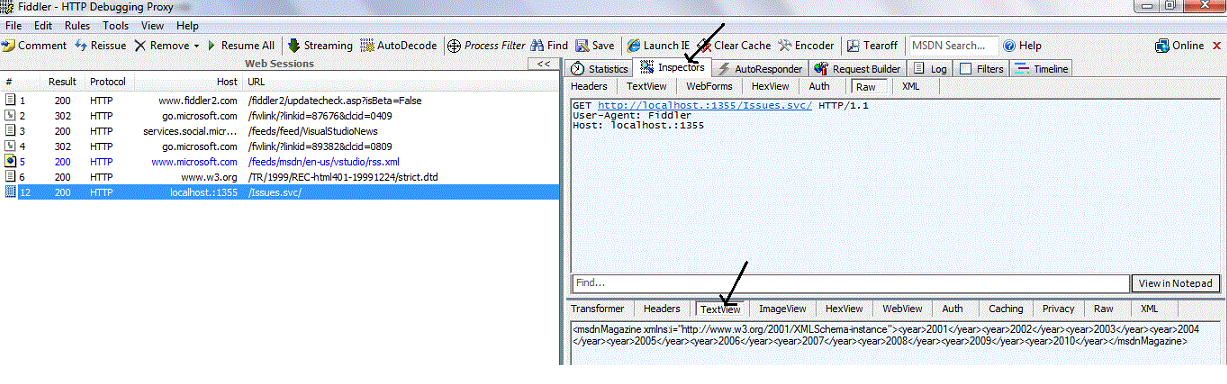
In addition to using Firefox or IE as a webclient you can also use Fiddler, click the RequestBuilder tab to enter urls. Enter a url in the textbox beneath the request builder tab.
The url you enter will appear in the left window.

Once you click on the matching url in the left window, it will be highlighted blue. Select the Inspectors tab from the menu of the top right window. The top right window displays request information, the bottom right window displays responses sent back by the service. Select the Textview tab from the menu in the bottom right window, the web service response will be displayed.

To make a post method request to a REST web service using Fiddler, enter the url then select Post method from drop down list.

In the Request Body window enter the values of your complex type object.

Fiddler and Firefox
In Windows XP using .NET 3.5 VS2008 running a WCF REST web service (created in an ASP.NET Web App Project) you only need to replace localhost with your local machine name (a.k.a computer name), and Fiddler will monitor any requests to this service and the resulting response. Machine name can be found by right clicking 'My Computer' then selecting properties. Replacing localhost with your machine name only needs to be done on the client side (Firefox browser in this case). With an address like this
http://localhost:1355/MyService.svc/
replace localhost with your local machine name
http://machinename:1355/MyService.svc/
Fiddler will now display request/response information.
Fiddler and Internet Explorer
In Windows 7 running the same service mentioned above Fiddler can be used to monitor traffic by adding '.' (a full stop) to the end of localhost in your IE url, for eg
http://localhost.:1355/MyService.svc/
Fiddler will not be bypassed and requests made using IE will be picked up together with any resulting responses.
Just Fiddler
In addition to using Firefox or IE as a webclient you can also use Fiddler, click the RequestBuilder tab to enter urls. Enter a url in the textbox beneath the request builder tab.
The url you enter will appear in the left window.

Once you click on the matching url in the left window, it will be highlighted blue. Select the Inspectors tab from the menu of the top right window. The top right window displays request information, the bottom right window displays responses sent back by the service. Select the Textview tab from the menu in the bottom right window, the web service response will be displayed.

To make a post method request to a REST web service using Fiddler, enter the url then select Post method from drop down list.

In the Request Body window enter the values of your complex type object.

Thursday, August 5, 2010
What is a WSDL document
A Web Services Description Language (WSDL) contains detailed information about how to access a Web Service. A WSDL contains information such as the operations, parameters and return values. The contents of WSDL are in XML format.
More information on WSDL is found at the following resources.
WSDL 1.1 specification: http://www.w3.org/TR/wsdl
WSDL 2.0 specification: http://www.w3.org/TR/wsdl20
WSDL 2.0 primer: http://www.w3.org/TR/wsdl20-primer
WSDL Elements
WSDL document contains the following main elements:
Definitions
This is the root element of the WSDL document. This contains a set of namespace declarations i.e. xmlns:prefix attributes. Each namespace prefix is bound to a URI. The name attribute names this WSDL document as AmazonSearch shown below. The targetNamespace attribute is similar to an XML Schema definition’s targetNamespace. The names declared within this WSDL document are in the http://soap.amazon.com namespace.
A WSDL from Amazon contains the following attributes.
Types
Data types used by the service are described by XML Schema.
An example:
A more complex example from Amazon:
Message
Defines input parameters and result of a service operation. The part element refers to a data type.
Port Type
Defines the operations and messages used.
Binding
Protocols used and message format is defined by the binding.
Note the attribute type is the portType. The name attribute must be unique.
Service
Groups a set of related port elements (endpoints), each specifying a binding with a corresponding address.
The following specifies Amazon’s AmazonSearchService located at the URL address http://soap.amazon.com/onca/soap2.
Operation
Operation describes a service action. Two main sections in a WSDL document containing operation information.
PortType section:
Binding section:
Port
Port specifies an endpoint at a particular address for a binding. Only one address can be specified.
WSDL Structure
The following defines how the above elements fit together to form a WSDL 1.1 structure.
More information on WSDL is found at the following resources.
WSDL 1.1 specification: http://www.w3.org/TR/wsdl
WSDL 2.0 specification: http://www.w3.org/TR/wsdl20
WSDL 2.0 primer: http://www.w3.org/TR/wsdl20-primer
WSDL Elements
WSDL document contains the following main elements:
Definitions
This is the root element of the WSDL document. This contains a set of namespace declarations i.e. xmlns:prefix attributes. Each namespace prefix is bound to a URI. The name attribute names this WSDL document as AmazonSearch shown below. The targetNamespace attribute is similar to an XML Schema definition’s targetNamespace. The names declared within this WSDL document are in the http://soap.amazon.com namespace.
A WSDL from Amazon contains the following attributes.
<wsdl:definitions xmlns:typens="http://soap.amazon.com"

    xmlns:xsd="http://www.w3.org/2001/XMLSchema"

    xmlns:soap="http://schemas.xmlsoap.org/wsdl/soap/"

    xmlns:soapenc="http://schemas.xmlsoap.org/soap/encoding/"

    xmlns:wsdl="http://schemas.xmlsoap.org/wsdl/"

    xmlns="http://schemas.xmlsoap.org/wsdl/"

    targetNamespace="http://soap.amazon.com"

    name="AmazonSearch">
Types
Data types used by the service are described by XML Schema.
An example:
<wsdl:types>

    <schema xmlns="" xmlns:xsd="http://www.w3.org/2001/XMLSchema"

        targetNamespace="http://MyCompany/MyProductService">

    <element name=”ProductName” " type="s:string" />

    <element name="Quantity" type="s:int" />

   </schema>

<wsdl:types>
A more complex example from Amazon:
<wsdl:types>

    <xsd:schema xmlns="" xmlns:xsd="http://www.w3.org/2001/XMLSchema"

        targetNamespace="http://soap.amazon.com">

    <xsd:complexType name="KeywordRequest">

        <xsd:all>

                <xsd:element name="keyword" type="xsd:string"/>

                <xsd:element name="page" type="xsd:string"/>

                <xsd:element name="mode" type="xsd:string"/>

                <xsd:element name="tag" type="xsd:string"/>

                <xsd:element name="type" type="xsd:string"/>

                <xsd:element name="devtag" type="xsd:string"/>

                <xsd:element name="sort" type="xsd:string" minOccurs="0"/>

                <xsd:element name="variations" type="xsd:string" minOccurs="0"/>

                <xsd:element name="locale" type="xsd:string" minOccurs="0"/>

            </xsd:all>

        </xsd:complexType>

        <xsd:complexType name="ProductInfo">

            <xsd:all>

                <xsd:element name="TotalResults" type="xsd:string" minOccurs="0"/>

                <!-- Total number of Search Results -->

                <xsd:element name="TotalPages" type="xsd:string" minOccurs="0"/>

                <!-- Total number of Pages of Search Results -->

                <xsd:element name="ListName" type="xsd:string" minOccurs="0"/>

                <!-- Listmania list name -->

                <xsd:element name="Details" type="typens:DetailsArray" minOccurs="0"/>

            </xsd:all>

        </xsd:complexType>

    </xsd:schema>

</wsdl:types>
Message
Defines input parameters and result of a service operation. The part element refers to a data type.
<message name="KeywordSearchRequest">

    <part name="KeywordSearchRequest" type="typens:KeywordRequest"/>

</message>

<message name="KeywordSearchResponse">

    <part name="return" type="typens:ProductInfo"/>

</message>
Port Type
Defines the operations and messages used.
<portType name="AmazonSearchPort">

    <operation name="KeywordSearchRequest">

        <input message="typens:KeywordSearchRequest"/>

        <output message="typens:KeywordSearchResponse"/>

    </operation>

</portType>
Binding
Protocols used and message format is defined by the binding.
Note the attribute type is the portType. The name attribute must be unique.
<binding name="AmazonSearchBinding" type="typens:AmazonSearchPort">

    <soap:binding style="rpc" transport="http://schemas.xmlsoap.org/soap/http"/>

    <!-- Binding for Amazon Web APIs - RPC, SOAP over HTTP -->

    <operation name="KeywordSearchRequest">

        <soap:operation soapAction="http://soap.amazon.com"/>

        <input>

            <soap:body use="encoded" encodingStyle="http://schemas.xmlsoap.org/soap/encoding/" namespace="http://soap.amazon.com"/>

        </input>

        <output>

            <soap:body use="encoded" encodingStyle="http://schemas.xmlsoap.org/soap/encoding/" namespace="http://soap.amazon.com"/>

        </output>

    </operation>

</binding>
Service
Groups a set of related port elements (endpoints), each specifying a binding with a corresponding address.
The following specifies Amazon’s AmazonSearchService located at the URL address http://soap.amazon.com/onca/soap2.
<service name="AmazonSearchService">

    <!-- Endpoint for Amazon Web APIs -->

    <port name="AmazonSearchPort" binding="typens:AmazonSearchBinding">

        <soap:address location="http://soap.amazon.com/onca/soap2"/>

    </port>

</service>
Operation
Operation describes a service action. Two main sections in a WSDL document containing operation information.
PortType section:
<operation name="KeywordSearchRequest">

   <input message="typens:KeywordSearchRequest"/>

   <output message="typens:KeywordSearchResponse"/>

</operation>
Binding section:
<operation name="KeywordSearchRequest">

    <soap:operation soapAction="http://soap.amazon.com"/>

    <input>

        <soap:body use="encoded" encodingStyle="http://schemas.xmlsoap.org/soap/encoding/" namespace="http://soap.amazon.com"/>

    </input>

    <output>

        <soap:body use="encoded" encodingStyle="http://schemas.xmlsoap.org/soap/encoding/" namespace="http://soap.amazon.com"/>

    </output>

</operation>
Port
Port specifies an endpoint at a particular address for a binding. Only one address can be specified.
<!-- Endpoint for Amazon Web APIs -->

<port name="AmazonSearchPort" binding="typens:AmazonSearchBinding">

    <soap:address location="http://soap.amazon.com/onca/soap2"/>

</port>
WSDL Structure
The following defines how the above elements fit together to form a WSDL 1.1 structure.
<definitions>

    <types> </types>

    <message>

        <part> </part>

    </message>

    <portType>

        <operation>

            <input> </input>

            <output> </output>

            <fault> </fault>

        </operation>

    </portType>

    <binding>

        <operation> </operation>

    </binding>

    <service>

        <port> </port>

    </service>

<definitions>
Subscribe to:
Posts (Atom)